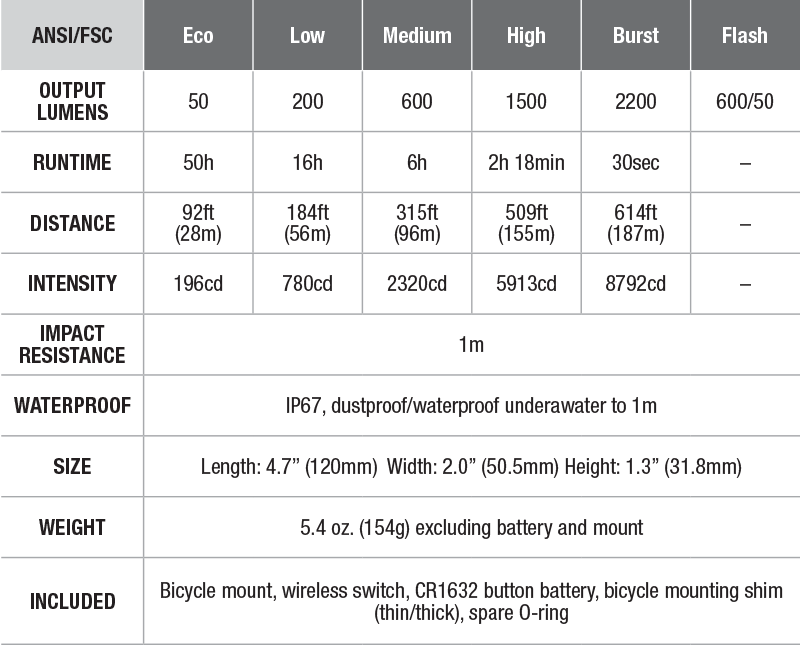
Bicycle light
Switches
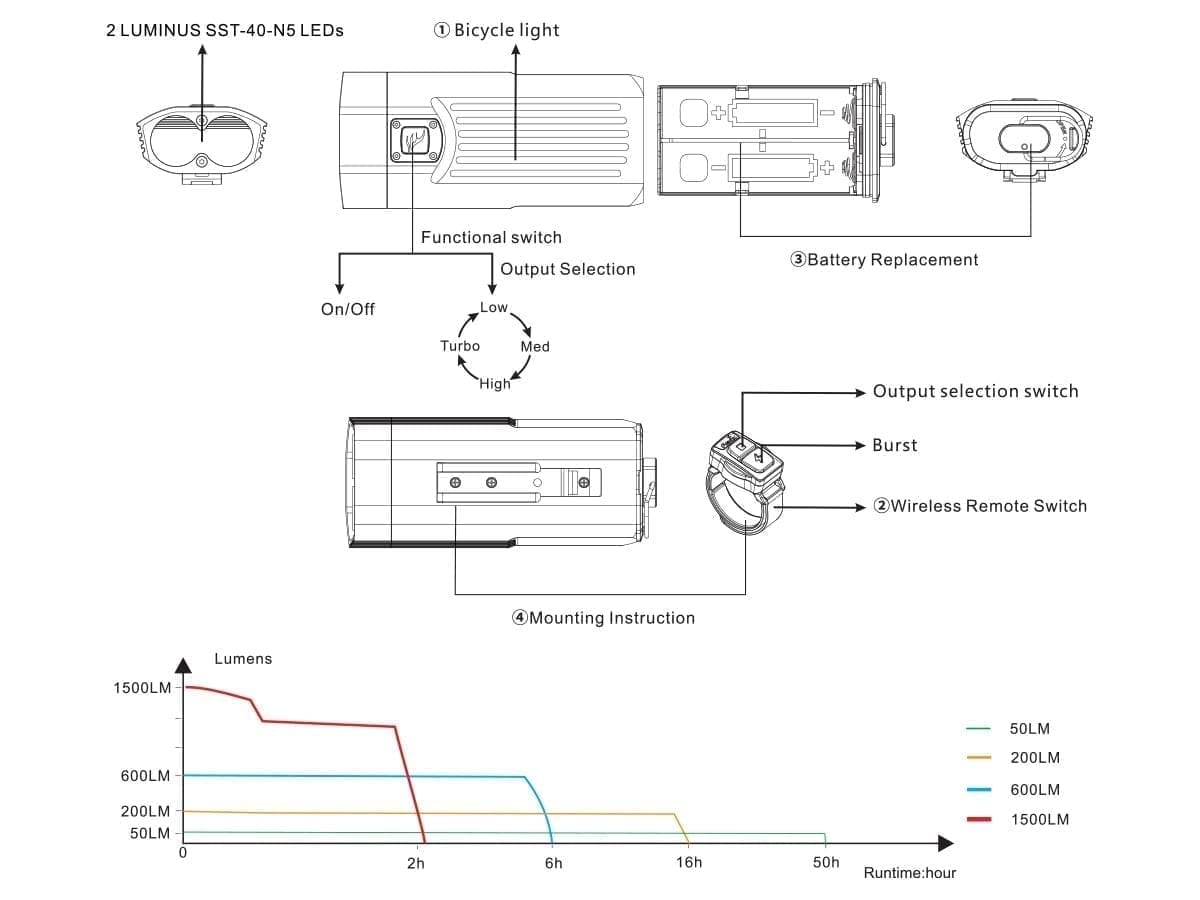
Functional switch
On/Off
Press and hold the functional switch for 0.5s to turn on/off the light.
Output Selection
With the light switched on, single click the functional switch to cycle through EDC/Eco→Low→Med→High.
Flash
With the light switched on, double click the functional switch to enter flash mode; single click the functional switch again to exit flash mode.
Wireless Remote Switch
Switches
Output selection switch Burst
Connecting with BC30 V2.0
First Connection
Press and hold the functional switch for 5 seconds, and the switch will flash red and green alternately, then single click any switch of the wireless switch, the bicycle light will light up to indicate connection is completed. Note:
- After the first connection, the wireless remote switch automatically memorizes the paired status. There is no need to match again afterwards.
- The linear distance between the light and the wireless switch should not exceed 1.5 meters during the pairing process.
Output Selection
With the light switched on, press and hold the output selection switch for 0.5s to enter/exit standby status, single click to cycle through EDC/Eco→Low→Med→High. And the light will automatically shut down after 10 minutes standing by if without any operation.
Instant Burst
With the light switched on, single click burst switch to enter Burst mode of 2200 lumens, which will last up to 30s. In 30s, single click any switch to exit Burst mode. Note: If the current battery is low, it will light up with the highest brightness supported by the current battery level.
Battery replaceable
Insert the coin into the back of the wireless switch, rotate the coin counterclockwise to open the battery cover; and then insert the battery, and tighten the back cover clockwise. Note: Change the CR1632 button battery every 3 months.
Battery level Indication
With the light switched off, single click the functional switch to check the battery status. The battery status percentage on this bright bike light will be displayed, and then goes out in 3 seconds.
- Green light constant on (saturated): 100% - 80%
- Orange light constant on (sufficient): 80% - 40%
- Red light constant on (poor): 40% - 10%
- Red light flashes: 10% - 0%
Note: This only works with Fenix ARB-L18 series 18650 battery.
Battery Specifications
| Type | Dimensions | Nominal Voltage | Usability | |
| Fenix ARB-L18 Series | 18650 | 3.6 V | Recommended | √√ |
| Non-rechargeable Battery (Lithium) | CR123A | 3 V | Usable | √ |
| Rechargeable Battery (LiFePO4) | 16340 | 3.2 V | Usable | √ |
| Rechargeable Battery (Li-ion) | 18650 | 3.6 V/3.7 V | Caution* | ! |
| Rechargeable Battery (Li-ion) | 16340 | 3.6 V/3.7 V | Banned | × |
| Rechargeable Battery (LiFePO4) | 18650 | 3.2 V | Banned | × |
Warning: Do not mix batteries of different brands, sizes, capacities or types. Doing so may cause damage to the flashlight or the batteries being used.
*18650 /16340 Li-ion batteries are powerful cells designed for commercial applications and must be treated with caution and handled with care. Only use quality batteries with circuit protection to reduce the potential for combustion or explosion. Cell damage or short circuiting are potential risks the user assumes.
Battery Replacement
- Rotate the tail cap button according to the direction of the "OPEN" logo, and pull out the battery case.
- Insert the battery according to the polarity markings of the battery compartment.
- Insert the battery case into the light body, and after the battery case is flush with the light body, rotate the tail cap button in the opposite direction of the "OPEN" logo.
Mounting Instruction
Bicycle light and wireless switch
- Loosen the screw of the bike mount. Fix the bike mount in the desired position on the bike handlebar and fasten the screw.
- Loosen the fine adjustment screw of the handlebar mount before clamping the mount to the bar by securely tightening the set screw. Slide the light into the mount until a distinct “click” is heard.
- Fasten the cable of the wireless switch to the desired position on the bike handlebar.
Note:
- Adjust the direction of the light before testing the power and functions of the bicycle light.
- Use the shims provided according to the diameter of the bicycle’s handlebars:
- Thick + thin shims together: diameter 22-28mm;
- Thin only: diameter 28-32mm);
- No shim (whenever applicable): diameter 32-35mm.
- The bicycle light can be used on a helmet with the Fenix bicycle light helmet holder.
Low-voltage Warning
The functional switch will flash red to remind to replace the batteries when the voltage level drops below a preset level. The bicycle light is programmed to step down a few lumens to prolong the runtime and the light will not turn off automatically.
Note: This may not work if 4*CR123A batteries are being used.
Overheat Protection
The light will accumulate a lot of heat when working on High mode for extended periods. When the light reaches a temperature of 65°C, the light will automatically step down a few lumens to reduce the temperature. High mode can be reselected if needed. This is a very bright bike light.
Usage and Maintenance
- Disassembling the sealed head can cause damage to the light and will void the warranty.
- Replace the battery in time to ensure normal use for next time.
- If the light will not be used for an extended period, remove the battery, or the light could be damaged by electrolyte leakage or battery explosion.
- Long-term use can result in O-ring wear. To maintain a proper water seal, replace the ring with an approved spare.
Warning
- This light is a high-intensity lighting device capable of causing severe eye damage. Avoid shining the light directly into anyone’s eyes.
- This light will accumulate a lot of heat when used for extended periods, resulting in high temperature of the flashlight shell. Pay attention to safe use to avoid scalding.


