*The round one is tactical switch and the semi-round one is mode switch.
ON/OFF
Tap the tactical switch to turn on the light temporarily, release it the light will go out.
Fully press the tactical tail switch to turn ON/OFF the light.
Mode Switching
With the light on, press the mode switch over 3 seconds, the LED will flash twice then constant-on. The light will shift between General mode and Simplified mode.
Output Selection
With the light on, single-click the mode switch to adjust the brightness level.
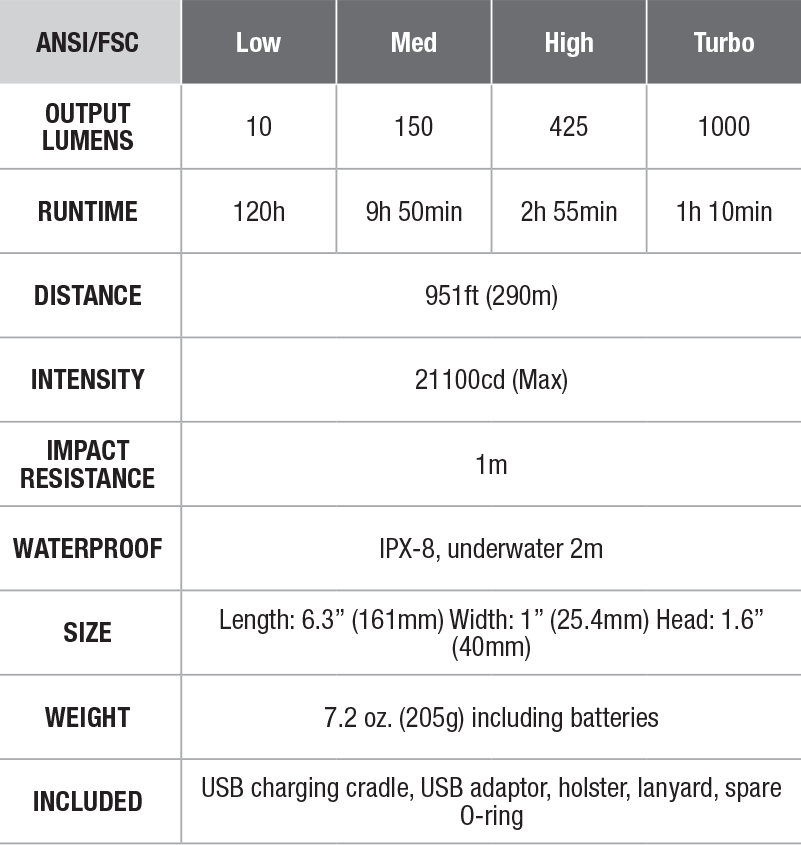
General Mode: To cycle through Low→Mid→High→Turbo.
Simplified Mode: To cycle through Mid→Turbo.
Instant Strobe
With the light off, long press the mode switch to enter momentary-on strobe, release it the light will go out.
With the light on, long press the mode switch for 0.5 seconds to enter strobe mode, single-click again to turn back to previous status.
Battery Level Indicator
With the light off, single-click the mode switch, the indicator light (in the middle of the charging contact) in the neck of the flashlight will be on for 3 seconds.
- Green light constant-on: sufficient power level
- Red light constant-on: low power level
- Red light flashes: critical power level
Low-voltage Warning Function
- When the working battery voltage is detected lower than 3.3V, the indicator light will shine automatically to remind charging needed.
- When the working battery voltage continues to drop lower, the flashlight will downshift to a lower brightness level. When it happens in low output mode, the flashlight will blink three times every five minutes to remind you to recharge the flashlight. To ensure normal use, the flashlight will not turn off automatically until Over-discharge Protection stops the battery from working.
Over-discharge Protection
When the battery voltage is extremely low, the flashlight will turn off automatically to protect the battery from over-discharging.
Over-heat Protection
The flashlight will accumulate a lot of heat when it is working at Turbo output. When the light is overheated up to 65 ℃ or above, the flashlight will automatically downshift the output to prevent the light from overheating. Please reset the Turbo output if needed when temperature drops.
Intelligent Memory Circuit
The flashlight memorizes the last used brightness level except strobe function. The next time you turn it on, it will recall the previously used brightness level in General Mode and Simplified Mode.
Charging
Put the flashlight head into the charger cradle and rotate it until it clicks into the position, match the polarity port of the flashlight and the cradle’s.
When power connects, the indicator light of the charging cradle will turn green without flashlight, the indicator light will turn red with flashlight plugged in, then turns green when charging completely done. The normal charging time is about 3 hours.
- Please charge the RC20 when the light is off to permit full and fast recharging.
- If emergency lighting is needed, the flashlight is available at Mid output level when it is charging.
Note: Please recharge a stored RC20 every four months to maintain optimum performance of the battery.
Battery Replacement
Unscrew the tail cap to insert Fenix ARB-L1 series rechargeable Li-ion battery, no need to identify the polarity mark, and then screw the tail cap back on.
Usage and Maintenance
- Disassembling the sealed head can cause damage to the light and will void the warranty.
- Fenix recommends using excellent quality battery. If the flashlight will not be used for an extended period, remove the battery, or the flashlight could be damaged by electrolyte leakage or battery explosion.
- Unscrew the tail cap one-half turn or take out the battery to prevent accidental activation during storage or transport.
- Continuous working at Turbo brightness level, the light may activate over-heat protection or light beam trembling, to maintain normal status, please lower the brightness level to cool down the flashlight.
- Long-term use can result in O-ring wear. To maintain a proper water seal, replace the ring with an approved spare.
- Periodic cleaning of the battery contacts improves the flashlight’s performance as dirty contacts may cause the flashlight to flicker, shine intermittently or even fail to illuminate for the following reasons:
Reason A: The batteries need replacing.
Solution: Replace batteries (Please confirm the correct installation of anode and cathode).
Reason B: The threads, PCB board contact or other contacts are dirty.
Solution: Clean the contact points with a cotton swab soaked in rubbing alcohol.
If the above methods don't work, please refer to the warranty policy before contacting your authorized distributor. Notice: The routine cleaning video can be watched and downloaded through Fenix official website, please log onto the service channel->“maintenance for light”.
Warning
The flashlight is a high-intensity lighting device capable of causing eye damage to the user or others. Avoid shining the light directly into anyone’s eyes.


