On/off
Press and hold the switch for 0.5 seconds to turn/off the light.
Output Selection
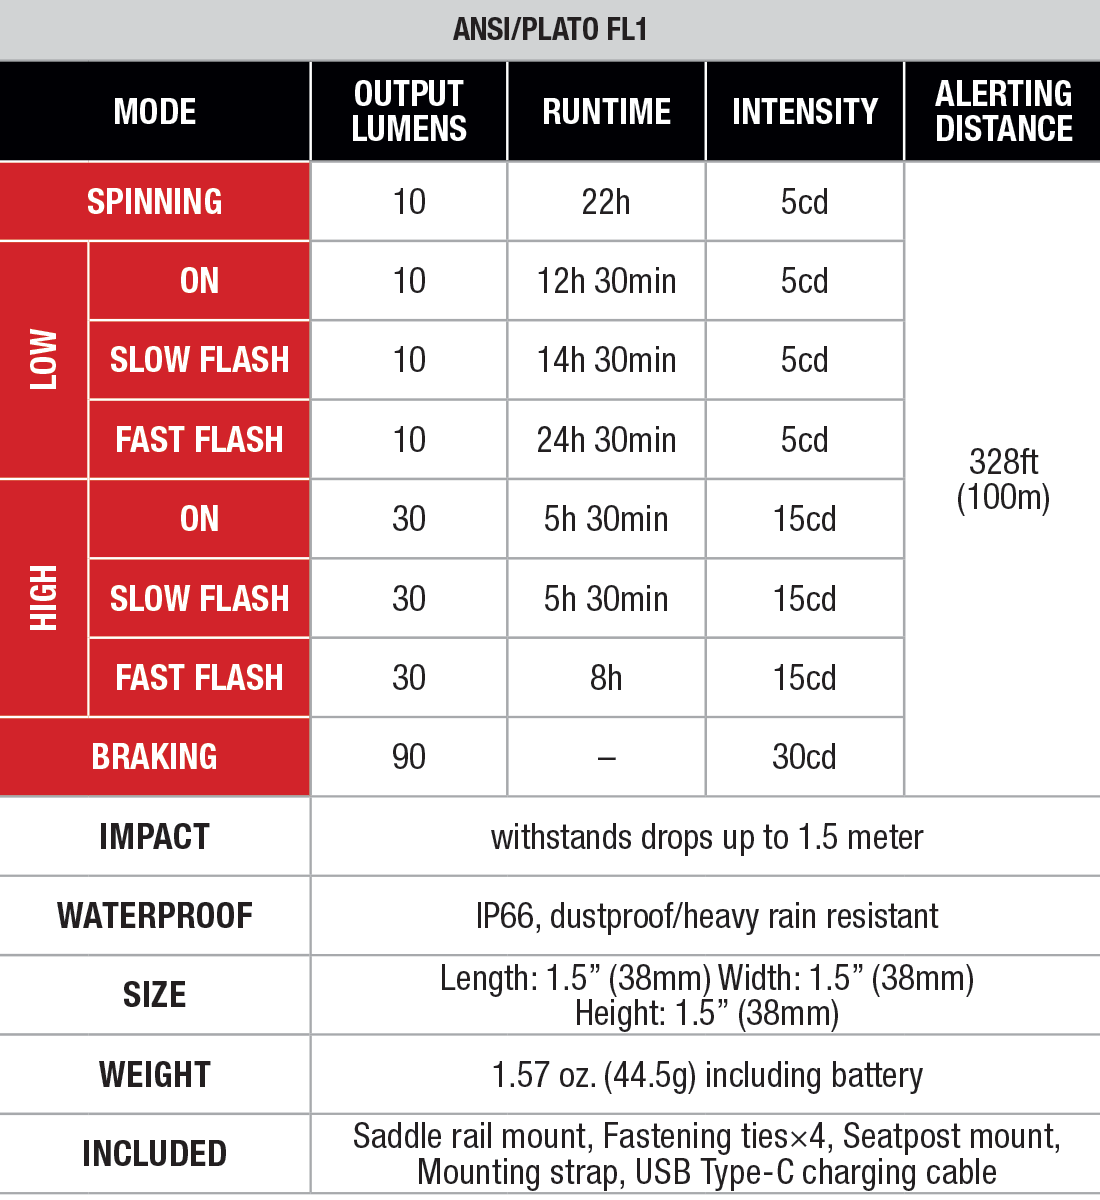
With the light switched on, single click the switch to cycle through (Low)Constant-on→(Low)Slow flashing→(Low)Fast flashing→(High)Constant-on→(High)Slow flashing→(High)Fast flashing→Spinning.
Mode switching
With the light switched on, a sudden reduction in riding speed will automatically trigger the Braking mode. After two seconds, the light will automatically recall the previously used output.
Intelligent Memory Circuit
The light memorizes the last selected output excluding Braking. When turned on again, the previously used output will be recalled.
Charging
- Turn off the light, open the anti-dust cover to reveal the USB Type-C charging port, and connect the USB Type-C socket of the charging cable to the light.
- The indicator will display red while charging and will turn green when fully charged.
- Once charging is completed, be sure to close the anti-dust cover to maintain the dustproof and waterproof ability.
Note:
- The normal charging time of the light is approximately 2 hours from depleted to fully charged.
- Recharge a stored light every four months to maintain optimum performance of the battery.
- The Constant-on output of Low mode can be operated while charging but the charging time will be prolonged.
Battery Level Indication
Each time the light is turned on, the indicator will indicate the battery level and will last for 3 seconds. With the light switched off, single click the switch to check the battery status, the indicator will last for 3 seconds.
Green light on: saturated 100% - 85%
Green light flashes: sufficient 85% - 50%
Red light on: poor 50% - 25%
Red light flashes: critical 25% - 1%
Low Voltage Warning
When the voltage level drops below 3.0V, the light is programmed to downshift to a lower brightness level. The battery level indicator blinks red at 3Hz to remind you to recharge the battery. To ensure normal use, the light will not turn off automatically and will work till the battery level runs out.
Mounting Instructions
Seatpost mount:
First loop the mounting strap (without LOGO) around one of the attachment ear of the seatpost mount, and place the seatpost mount(silicone pad thinner side face up) on the seatpost, then loop the other end of the mounting strap (with LOGO) around the other attachment ear of the seatpost mount, adjust as the size of the seat post. Finally, attach the BC06R taillight to the seatpost mount with the switch facing upwards.
Note: This taillight is applicable to bike seatpost diameters between 25.4mm - 31.6mm.
Saddle rail mount:
Place the saddle rail mount on the saddle rails of the bike. Thread a fastening tie through the top hole on one side of the mount, and tie the corresponding saddle rail and the saddle mount together. Repeat the same process for the other side. Trim any excess parts of the fastening ties. Attach the BC06R taillight to the saddle rail mount with the switch facing upwards.
Note: This taillight is applicable to bike saddle rail distance between 39.0mm - 50.0mm.
Usage and Maintenance
- Disassembling the sealed head can cause damage to the light and will void the warranty.
- Recharge the battery in time to ensure normal use for next time.
- Recharge a stored light every four months to maintain optimum performance of the battery.
- The lamp may flicker, shine intermittently or even fail to illuminate for the following reason:
Poor battery level.
Solution: Recharge the battery.
If this method doesn't work, please contact your authorized distributor.
Warning
- The taillight is a high-intensity lighting device capable of causing eye damage to the user or others. Avoid shining the light directly into anyone’s eyes.
- The LED of this light is not replaceable; so the light will need to be replaced when the LED reaches the end of its lifespan.
- If any of the information provided in this manual is changed, the new version of the manual shall prevail; if your included user manual is an old one, it acquiesces that we won't send a new manual.


