On/Off
Press and hold the switch for 0.5s to turn the light on/off.
Output Selection
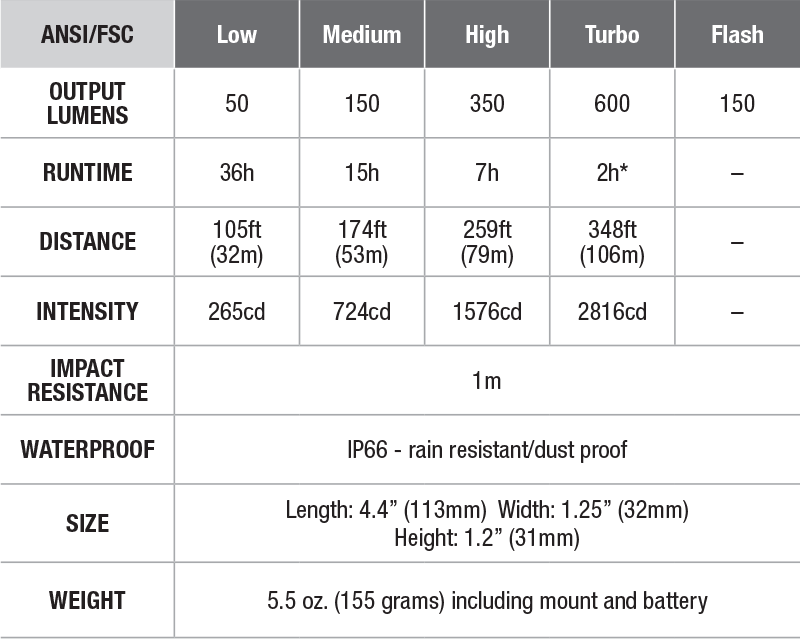
With the light switched on, single click the switch to cycle through Low→Med→High→Turbo.
Flash
With the light switched on, double click the switch to enter flash, single click to turn back to general mode.
Battery level Indication
With the light switched off, single click the switch to check the battery status. The battery level indicators will display the battery status for 3 seconds.
- One light on: critical, 0% – 25%
- Two lights on: poor, 26% – 50%
- Three lights on: sufficient, 51% – 85%
- Four lights on: saturated, 86% – 100%
Charging
One standard Micro USB charging cable, which can be used for charging other digital devices, is included.
Operation
With the light switched off, remove the dust cover of the bicycle light to reveal the charging port, and plug the Micro USB end of the USB cable into the light’s charging port, then connect the other end of the USB cable to a USB power adaptor.
Charging Indicator:
The indicators near the switch will display charging status. Four indicators will remain constant on when the battery is fully charged.
Note:
- Once charging is completed, be sure to remove the charging cable and replace the dust cover.
- The normal charging time of the built-in battery is 2.5 hours from fully depleted to fully charged with the light off.
- Recharge the light timely when the battery level is critical, for future use.
- Recharge a stored light every three months to maintain optimal battery performance.
- Only Low output can be used while the light is being charged, but charging time will be prolonged.
Intelligent Memory Circuit
The light memorizes the last selected brightness level on General mode. When turned on again the previously used brightness level will be recalled.
Overheat Protection
The light will accumulate a lot of heat when working on Turbo mode. The light will automatically step down a few lumens to reduce the temperature, but turbo mode can be reselected.
Low-voltage Warning
One of the indicators flashes when the battery level is critical. When the voltage level drops below a preset level, the bicycle light is programmed to step down to a lower brightness level until Low output is reached. To ensure normal use, the bicycle light will work until the battery runs out.
Mounting Instruction
Bicycle Light and bicycle mount
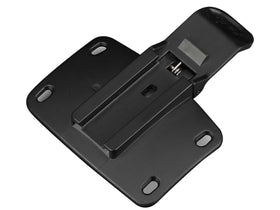
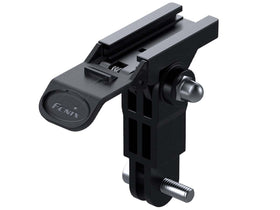
- Unscrew the screw of the bike mount. Fix the bike mount in the desired position on the bike handlebar and fasten the screw.
- Loosen the fine adjustment screw of the handlebar mount before clamping the mount to the bar by securely tightening the set screw.
- Slide the light into the mount until a distinct “click” is heard.
Note:
- Adjust the direction of the light before testing the power and functions of the bicycle light.
- Use the shims provided according to the diameter of the bicycle’s handlebars:
- Thick + thin shims together: diameter 22-28mm;
- Thin only: diameter 28-32mm);
- With no shim (whenever applicable): diameter 32-35mm.
Usage and Maintenance
- Disassembling the sealed head can cause damage to the light and will void the warranty.
- The light will accumulate a lot of heat when working on Turbo mode. Do not touch the heat dissipation fins.
- For secure transportation, the bicycle light is not fully charged before delivery. Recharge it before first use.
- Store a fully charged light in a dry, ventilated place if it will not be used for a long time. Recharge a stored light before reuse.
Warning
This light is a high-intensity lighting device capable of causing eye damage to the user or others. Avoid shining the light directly into anyone’s eyes.


